

Paving looks its best when the edges are clean, stable, and properly supported. Without the right edging, pavers can shift, spread, sink, or lose their sharp finish over time, especially around driveways, patios, pathways, and garden borders.
That is where a proper paver edging guide becomes useful.
This article covers paver edge retention, border paving stones, curved edges, edging materials, installation methods, common mistakes, and design ideas to help you create outdoor spaces that look polished and stay structurally sound.
What Is Paver Edging?
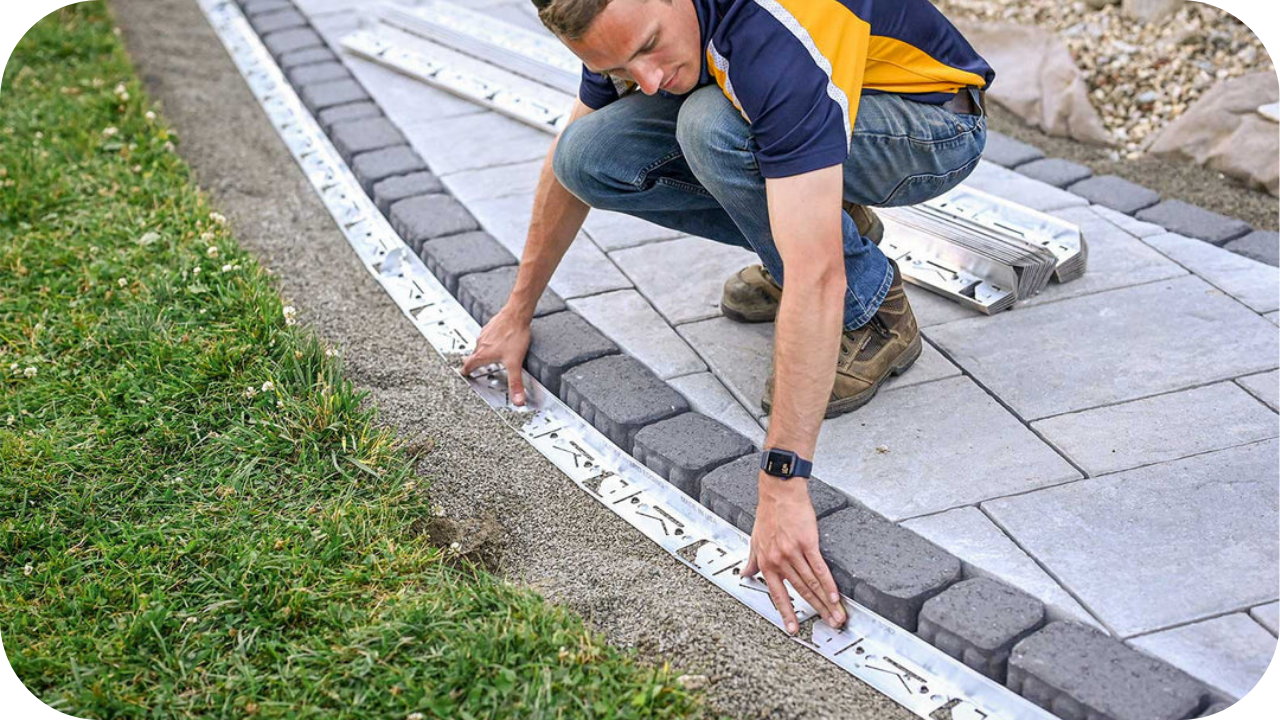
Paver edging is the structural boundary installed around the outside of a paved area to hold the pavers in place. It helps stop pavers from spreading, shifting, sinking, or losing their shape as the surface handles foot traffic, vehicle weight, weather, and soil movement.
Edging can be visible or hidden, depending on the design. Some projects use natural stone borders for a polished finish, while others use concrete restraints, steel edging, aluminium edging, plastic restraints, paver kerbs, mortared edge courses, or compacted aggregate shoulders.
A good edge does more than frame the paving. It protects the bedding layer, supports joint material, defines the layout, and helps the paved area stay neat over time. Whether used around a driveway, patio, pathway, lawn edge, garden bed, or alfresco zone, proper edging works best when it is planned as part of the wider stone paver installation process.
Why Proper Paver Edging Matters

Proper paver edging is important because it protects both the structure and appearance of a paved area. Without strong edge support, pavers can slowly move outward, joint material can wash away, and the surface can become uneven over time.
This matters most in areas exposed to regular movement, such as driveways, walkways, patios, garden paths, and outdoor entertaining spaces. A well-planned edge keeps the layout firm while giving the finished surface a cleaner, more intentional look.
Key benefits of proper paver edging include:
- Keeps pavers in position: Edge restraints stop pavers from spreading outward under foot traffic, vehicle load, soil pressure, and weather movement.
- Protects the base and joint material: Strong edging helps hold bedding sand, compacted aggregate, and joint filler in place, reducing washout and surface instability.
- Improves safety: Secure edges reduce loose pavers, uneven borders, tripping hazards, and unstable walking surfaces.
- Controls erosion and drainage: Proper edging helps manage runoff and prevents water from washing away support material around the paved area.
- Defines the landscape layout: Borders separate paving from lawns, garden beds, gravel, mulch, and surrounding hardscape materials.
- Reduces long-term maintenance: Stable edges mean fewer repairs, less repositioning, fewer joint refills, and a longer-lasting paved surface.
Where to Use Border Paving Stones in Landscaping
Border paving stones can be used anywhere a landscape needs cleaner structure, stronger edge support, or a more polished transition between surfaces. They help separate paved areas from lawn, gravel, garden beds, soil, mulch, and other outdoor materials while reinforcing the edge of the paving.
Pathways and Walkways
Border stones help define the direction and shape of a path. They keep pavers, gravel, or stepping stones contained while creating a clearer walking route through the garden, which is especially useful when planning garden pavers and pathways that need both structure and visual flow.
They also improve safety by making the path edge easier to see and reducing movement along the sides.
Driveways and Vehicle Areas

Driveways need stronger edge support because vehicle weight can push pavers outward over time. Border paving stones, kerbs, concrete restraints, or mortared edge courses help hold the surface in place under repeated pressure, especially when choosing driveway pavers for a high-use outdoor area.
A strong driveway border also reduces crumbling edges, loose joints, and surface spread.
Garden Beds and Planters
Border paving stones work well around garden beds because they keep soil, mulch, and decorative gravel contained. They also create a clean separation between planting areas and paved surfaces.
This makes garden beds easier to maintain and helps the overall landscape look more organised.
Lawn Edges and Turf Boundaries
Paver edging can stop grass from creeping into paved areas or garden beds. It also creates a crisp boundary that reduces trimming work and keeps lawn edges looking neat.
Flush edging works well for subtle transitions, while raised edging can create stronger visual definition.
Patios and Alfresco Areas
Border stones can frame patios and alfresco zones, giving outdoor entertaining spaces a more finished appearance. They also help manage transitions between paving, garden areas, lawn, decking, or gravel, which can make a stone patio feel more structured and complete.
When chosen well, the border improves both stability and design flow.
Best Paver Edging and Edge Restraint Options
The best paver edging option depends on the area being paved, the expected traffic, the design style, the soil condition, and whether the edge should be visible or hidden. A driveway usually needs a stronger restraint than a garden path, while curved borders may need a more flexible edging material.
| Edging Option | Best For | Strength Level | Design Style | Key Consideration |
| Concrete edge restraints | Driveways, patios, high-traffic paving | Very high | Hidden or defined | Strong and long-lasting, but it needs proper base preparation and installation. |
| Aluminium or steel edging | Modern gardens, clean lines, curves | High | Sleek and contemporary | Durable, low-profile, and suitable for straight or curved layouts. |
| Plastic edge restraints | DIY paths, garden areas, curved edges | Medium | Hidden and flexible | Affordable and easy to install, but not ideal for heavy vehicle loads. |
| Natural stone borders | Premium gardens, patios, organic layouts | High | Rustic, natural, architectural | Adds strong visual appeal while reinforcing the paved edge. |
| Paver kerbs or block edge courses | Driveways, paths, formal borders | High | Seamless and integrated | Works well when matched with the main paving material. |
| Compacted aggregate shoulders | Informal garden paths and rustic areas | Medium | Natural and low-cost | Best for lighter-use areas where a softer edge suits the landscape. |
| Mortared edge courses | Formal paths, courtyards, heritage-style paving | Very high | Permanent and polished | Creates a strong fixed edge but requires careful base and mortar work. |
| Brick edging | Traditional gardens and classic homes | Medium to high | Timeless and decorative | Works well around garden beds, walkways, and older-style landscapes. |
| Timber log edging | Rustic gardens and soft landscapes | Medium | Natural and warm | Needs durable or treated timber to reduce decay over time. |
| Recycled rubber edging | Curved gardens and eco-conscious projects | Low to medium | Flexible and practical | Better for light garden use than structural paving support. |
For high-use areas, prioritise strength and stability first. Concrete restraints, paver kerbs, natural stone borders, and mortared edge courses are usually better suited to driveways, main patios, and heavily used paths.
For decorative gardens, curved borders, and lighter pathways, metal, plastic, brick, timber, or compacted aggregate edging can work well when installed on a stable base.
How to Choose the Right Paver Edging Material

Choosing the right paver edging material depends on how the space will be used, how much pressure the edge must handle, and the overall look you want to achieve. A border that works well around a garden bed may not be strong enough for a driveway, so the decision should balance strength, style, drainage, and long-term maintenance.
1. Match the Edging to Traffic Levels
High-traffic areas need stronger edging materials. Driveways, main walkways, and busy patios benefit from concrete restraints, paver kerbs, mortared edge courses, or natural stone borders because they can handle pressure and repeated movement.
For lighter garden paths or decorative borders, plastic edging, metal edging, brick, timber, or compacted aggregate may be suitable when installed correctly.
2. Consider Soil and Base Stability
Soft soil, sloped areas, and wet ground need stronger support. If the base is weak, the edging may tilt, sink, or move, even if the material itself is durable.
A compacted base is essential before installing any edging. Strong edge restraint works best when the foundation beneath it is level, firm, and properly prepared.
3. Plan for Drainage
Paver edging should support the paved area without trapping water. Poor drainage can wash away bedding sand, weaken mortar, encourage weed growth, and cause movement along the edges.
Choose edging that allows water to move away from the paving. In some areas, this may require a slight fall, drainage gaps, gravel shoulders, or a proper runoff plan.
4. Choose a Style That Matches the Landscape
The edging should suit the broader outdoor design. Natural stone borders work beautifully in premium gardens, rustic paths, patios, and organic landscapes. Metal edging suits modern designs with clean lines, while brick edging fits traditional gardens and classic homes.
For a subtle finish, hidden restraints may work best. For stronger visual definition, raised stone borders or contrasting paver edges can create a sharper frame.
5. Think About Long-Term Maintenance
Some edging materials need more attention than others. Timber may require treatment, plastic may shift in high-use areas, and mortared edges may need occasional joint checks.
Durable materials such as natural stone, concrete, aluminium, steel, or paver kerbs usually provide better long-term performance when matched to the right application.
Paver Edging Design Ideas for Gardens, Paths and Patios
Paver edging can do more than hold a paved area in place. The right border can shape movement, highlight garden zones, soften hardscape lines, and make the whole outdoor space feel more considered. These design ideas work across patios, paths, driveways, courtyards, garden beds, and lawn edges.
Contrasting Stone Borders
A contrasting border can make a paved area feel sharper and more defined. You can use a darker stone around lighter paving, or a lighter border around darker pavers, to create a clean frame that suits more considered paving design ideas
This works especially well around patios, pathways, courtyards, and formal garden areas where strong visual structure matters.
Natural Stone Garden Borders
Natural stone borders suit landscapes that need warmth, texture, and an organic finish. Durable options such as Bluestone Cobble work beautifully around garden beds, lawn edges, stepping-stone paths, and rustic outdoor zones.
The irregular character of natural stone can make the border feel more connected to planting, soil, gravel, and surrounding landscape features.
Curved Borders for Softer Landscapes
Curved paver edging helps soften straight lines and create a more natural flow through the garden. It works well around planted beds, winding paths, circular patios, and relaxed outdoor spaces.
Curves can make smaller landscapes feel more open and less rigid when planned carefully.
Paver Kerb Edging for Driveways
Paver kerbs or block edge courses are ideal for driveways because they provide both strength and a finished look. They help retain the paving edge while creating a cleaner transition between the driveway and the surrounding landscape.
For best results, driveway edging should be chosen for load support, not appearance alone.
Flush Edging for Minimalist Patios
Flush edging creates a subtle, low-profile finish where the border sits level with the paving. This approach suits modern patios, alfresco zones, and clean architectural landscapes.
It gives the area a seamless appearance while still helping define the edge.
Raised Borders for Garden Beds
Raised stone or block edging works well where you need to contain mulch, soil, gravel, or planting zones. It creates a stronger visual boundary and helps keep garden material from spilling onto paved areas.
This option suits lawn edges, planter borders, and layered garden designs.
Edging with Landscape Lighting
Low-profile border stones can be paired with in-ground or strip lighting to improve safety and ambience. This works well along walkways, steps, driveways, and entertaining areas.
Lighting also highlights the shape of the border at night, making the landscape feel more polished.
Mixed Texture Edging
Combining finishes such as tumbled, flamed, split-face, or smooth stone can add subtle depth to the landscape. Mixed textures work best when the tones remain coordinated, so the edging feels intentional rather than busy.
This is useful for premium outdoor spaces that need detail without overwhelming the main paving.
How to Install Paver Edging Correctly
Installing paver edging correctly starts with a stable base, accurate layout, and the right fixing method for the edging material. Even strong edging can fail if the ground beneath it is poorly prepared or if the restraint is not secured tightly against the paving.
1. Prepare and Level the Site
Begin by clearing the area where the pavers and edging will sit. Remove loose soil, roots, debris, and soft material that could shift later.
Excavate to the required depth, then compact the base properly using crushed rock, road base, or another suitable foundation material. A firm, level base helps prevent the edging from sinking, tilting, or pulling away from the pavers over time.
2. Dry-Lay the Pavers and Border
Before fixing anything permanently, dry-lay the pavers and border stones in position. This allows you to check the shape, spacing, alignment, and overall look of the layout.
Dry-laying is especially useful for curved borders, patterned paving, garden paths, and areas where cuts will be needed. It helps you correct issues before mortar, spikes, or restraints are locked in place.
3. Position the Edge Restraint
Place the edging tightly against the outside row of pavers. There should be no large gaps between the pavers and the restraint, as gaps can allow movement and weaken the edge.
For visible borders, make sure the height, spacing, and face alignment are consistent. For hidden restraints, ensure they sit low enough to support the edge without interrupting the finished surface.
4. Secure the Edging Properly
The fixing method depends on the edging type. Plastic and metal restraints are usually fixed with spikes or pins. Concrete and mortared edge courses need a solid base and careful setting. Natural stone borders may be dry-laid, mortared, or installed on a compacted foundation, depending on the project.
Driveways and high-traffic areas need stronger fixing than garden beds or decorative paths.
5. Backfill and Compact Around the Edge
Once the edging is in place, backfill the outside edge with compacted soil, crushed rock, sand, gravel, or another suitable material. This supports the restraint from the outside and helps prevent lateral movement.
Compact the backfill carefully so the edging stays firm, especially around curves, corners, and high-use areas.
6. Check Alignment Before Finishing
Use a string line, straight edge, level, or flexible guide to check the final alignment. Straight edges should look clean, while curves should flow smoothly without awkward bends or uneven spacing.
Small corrections are easier before the surface is fully locked in.
7. Finish the Joints
After the edging is secure, fill the paver joints with joint sand, polymeric sand, or mortar, depending on the installation style. A proper paverjoint filling and sealing approach helps stabilise the surface and reduces movement between pavers.
Sweep away excess material, settle the joints as required, and check the edge again after the first heavy rain or regular use.
How to Cut a Curved Edge in Pavers

Curved paver edges can make a path, patio, or garden area feel softer and more natural. They work well around planting zones, circular features, winding walkways, and outdoor spaces where straight lines would feel too harsh. The key is careful planning, accurate marking, and secure edge support once the curve is cut.
Plan the Curve First
Start by mapping the curve before any cutting begins. Use a garden hose, rope, flexible conduit, or marking paint to test the shape directly on the ground.
Step back and look at the curve from different angles. A good curve should feel smooth, balanced, and practical for movement through the space. Avoid tight bends unless the design needs them, as sharper curves require more cuts and smaller paver pieces.
Dry-Lay Before Cutting
Place the pavers along the curve without fixing them permanently. This helps you see how the pattern will sit, where joints will fall, and which pavers need trimming.
Dry-laying also reduces waste because you can adjust the curve before cutting. It gives you a clearer idea of how the finished edge will look against lawns, garden beds, gravel, or surrounding paving.
Mark and Cut the Pavers Safely
Once the layout is confirmed, mark each cut line with chalk, spray paint, or a masonry pencil. Use a diamond blade suited to the paver material, and wear proper safety gear, including eye protection, gloves, hearing protection, and a dust mask.
Cut slowly and steadily. Forcing the tool can chip the edge, crack the paver, or create an uneven curve. If possible, use water or dust control to reduce airborne particles while cutting.
Smooth and Fit Each Piece
After cutting, check each paver against the curve. Smooth any rough edges with a masonry file, sanding block, or suitable finishing tool.
Dry-fit the pieces again before setting them permanently. This allows you to adjust spacing, improve alignment, and make sure the curve flows cleanly from one paver to the next.
Secure the Curve with Edge Restraints
Curved edges need strong restraint because the pavers are more likely to move if the outer edge is unsupported. Use a flexible edge restraint, mortared border, natural stone edge, or another suitable option based on the surface and traffic level.
Once the curve is secure, refill the joints, compact where required, and check that the edge remains stable. A well-supported curve should look natural while still holding its shape over time.
Common Paver Edging Mistakes to Avoid
Even a quality edging material can fail if it is installed poorly or used in the wrong setting. Most paver edging problems begin with weak base preparation, poor drainage, incorrect material choice, or rushed layout work.
Avoid these common mistakes to keep your paving stable, safe, and visually sharp:
- Skipping edge support: Without proper restraints, pavers can shift, spread, sink, or create trip hazards over time.
- Choosing the wrong material: Lightweight edging may fail in driveways, while rigid materials may not suit tight curves or flexible garden layouts.
- Poor base preparation: A weak, loose, or uneven base can cause the edging to tilt, sink, lift, or move after installation.
- Ignoring drainage: Water can erode bedding material, weaken mortar, soften soil, and destabilise the edge if runoff is not planned properly.
- Misjudging curves: Poor radius planning can create awkward cuts, uneven spacing, weak edges, and a curve that looks forced rather than natural.
- Forgetting joint spacing: Tight or inconsistent joints affect alignment, reduce stability, and make the finished edge look uneven.
- Using the wrong cutting blade: An unsuitable blade can chip, crack, overheat, or damage pavers, especially when cutting natural stone or curves.
- Failing to compact around the edge: Edging needs support on both sides. Without backfilling and compacting, it can slowly move under pressure.
- Not checking alignment before fixing: Once edging is mortared, pinned, or backfilled, correcting a crooked line becomes much harder.
- Ignoring seasonal movement: Roots, rain, soil movement, and heavy use can shift edging over time, so small issues should be corrected early.
How to Maintain Paver Edges Long Term
Paver edging should be checked regularly after installation, especially in outdoor areas exposed to rain, soil movement, roots, foot traffic, or vehicle pressure. A few simple maintenance habits can keep the edges stable and prevent small issues from turning into larger paving repairs.
Use this checklist to maintain your paver edges properly:
- Inspect edges seasonally: Look for lifting, sinking, spreading, loose restraints, cracked mortar, or gaps forming along the edge.
- Refill joint sand when needed: Open joints can allow water, weeds, ants, and movement to weaken the paving layout.
- Clear soil and mulch build-up: Excess material pressed against edging can trap moisture, hide movement, and encourage weed growth.
- Check drainage after heavy rain: Water should flow away from the paved area instead of pooling along the border.
- Trim nearby roots and grass: Roots and turf can push against edging, loosen restraints, or make borders harder to maintain.
- Repair small movement early: A slightly loose edge is easier to fix than a section that has shifted, sunk, or pulled away.
- Clean natural stone borders gently: Use pH-neutral cleaners and soft brushes to protect the stone’s finish and colour, following the same careful approach used for paver cleaning and maintenance
- Recheck curved edges: Curves can shift if restraints loosen, so inspect them closely during routine garden maintenance.
Long-term edging performance depends on structure, drainage, and upkeep working together. When the base, border, and surrounding landscape are maintained properly, paver edges stay cleaner, safer, and more visually defined for years.
Choosing a Lasting Edge for Your Outdoor Space
Paver edging does more than complete the look of a paved area. It supports the structure, holds the layout together, protects the base, and keeps outdoor spaces safer and easier to maintain.
The right edging choice depends on the surface, traffic level, soil condition, drainage, material, and design style. Driveways need stronger restraints, while garden paths, patios, and curved borders may allow more flexible or decorative options.
For a lasting result, choose materials that suit the space and install them properly from the beginning. Splendour in Stone can help you select premium natural stone borders and paving solutions that bring strength, structure, and style to your outdoor project.
FAQs
1. What is the best edging for pavers?
The best edging for pavers depends on the area and traffic level. Concrete edge restraints, mortared edge courses, paver kerbs, and natural stone borders are best for driveways, patios, and high-use areas. Metal or plastic edging can work well for lighter garden paths and curved landscape borders.
2. Do pavers need edge restraints?
Yes, most paved areas need edge restraints to prevent pavers from spreading, shifting, or losing joint material. Edge restraints are especially important around driveways, walkways, patios, sloped areas, and curved layouts where movement can affect both safety and appearance.
3. What is the difference between paver edging and border paving stones?
Paver edging refers to the structural restraint that holds the paved area in place. Border paving stones are visible stones used to define, frame, or decorate the edge. In many landscapes, border paving stones provide both structural support and a polished design finish.
4. Can you create curved paver edges?
Yes, curved paver edges can be created with careful planning, dry-laying, marking, cutting, and edge restraint installation. A smooth curve usually requires accurate radius planning, the right cutting blade, consistent joint spacing, and flexible or properly shaped edging to hold the curve securely.
5. How do you stop paver edges from moving?
To stop paver edges from moving, start with a compacted base, use a suitable edge restraint, secure it properly, backfill around the edge, and maintain joint sand. Good drainage is also essential because water movement can weaken the base and cause edging to shift.
6. Is natural stone good for paver edging?
Yes, natural stone is a strong and attractive option for paver edging. It works well around patios, pathways, garden beds, lawn edges, and premium outdoor spaces. Natural stone borders add durability, texture, and a high-end finish while helping define the paved area.
7. How do you maintain paver edging?
Maintain paver edging by inspecting it regularly, refilling joint sand, clearing soil or mulch build-up, trimming grass and roots, and checking drainage after heavy rain. Any loose, sinking, or shifting edges should be repaired early before they affect the surrounding pavers.

