A stunning patio can quickly lose its charm with weeds sprouting or pavers shifting out of place.
Polymeric sand is the solution—locking pavers securely, preventing weed growth, and ensuring long-term stability. This special sand helps keep your patio looking pristine, season after season.
Want to learn how to use polymeric sand for a flawless finish? Keep reading to find out how this simple yet effective material can transform your outdoor space.
What is Polymeric Sand?
Polymeric sand is a specially engineered mixture of sand and polymers designed for use between pavers.
When activated with water, the polymers bind the sand particles together, creating a strong, durable bond that locks the pavers in place. This unique composition helps prevent weed growth, reduce shifting, and minimise erosion.
It also allows water to flow through the joints while maintaining the integrity of the paver structure. Polymeric sand is commonly used in patios, driveways, and walkway installations, providing enhanced stability and longevity for outdoor spaces.
Tools and Materials You’ll Need
To achieve a flawless paver installation with polymeric sand, having the right tools and materials is crucial. These essential items will make the process smoother and ensure long-lasting results. Here’s what you’ll need:
- Polymeric sand: Choose high-quality, moisture-resistant sand suitable for your pavers and joint size.
- Broom: To sweep sand into the joints between pavers.
- Leaf blower: To clear excess sand off the paver surface without disturbing the joints.
- Plate compactor or rubber mallet: To compact the sand into the joints and ensure a firm bond.
- Sprayer or watering can: To activate the polymeric sand by wetting it.
- Level: To ensure the pavers are laid flat and even.
- Edging materials: Such as plastic or metal strips, to secure the patio perimeter.
Step-by-Step Guide on How to Use Polymeric Sand for Pavers
Achieving a perfect patio starts with the right application of polymeric sand. Follow these step-by-step instructions to keep your pavers securely locked in place, preventing shifting, weeds, and erosion for years.
Step 1: Clean and Dry the Paver Surface
Before applying polymeric sand, ensure the paver surface is clean and completely dry. Remove dust, dirt, debris, and moisture to allow the sand to bond effectively.
Check that the joints between pavers are 1/8″ to 1/4″ deep. Proper surface preparation ensures optimal adhesion, preventing uneven settling and poor bonding, which can lead to long-term issues such as shifting pavers.
Step 2: Apply Polymeric Sand
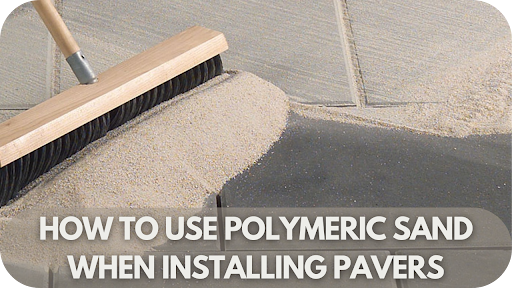
Select the correct polymeric sand for your climate and paver type. Spread the sand evenly over the surface and use a broom to sweep it into the joints. Ensure the joints are completely filled without overfilling.
Properly filling the joints creates stability, reduces weed growth, and helps to prevent the pavers from shifting. This step is crucial for long-term durability and maintaining the overall appearance.
Step 3: Compact the Sand into the Joints
Use a plate compactor to compact the sand into the joints, moving in multiple directions, both side-to-side and diagonally. Compaction is vital to secure the sand and ensure the pavers stay stable.
Compacting the sand properly prevents future shifting or unevenness in the pavers. Avoid disturbing the pavers while compacting to maintain a smooth, level surface for the final installation.
Step 4: Activate the Polymeric Sand
Lightly mist the sand with water after compacting to activate the polymeric sand. Be cautious not to use excessive water, as this can cause washout and improper curing.
The correct moisture level allows the sand to bond and lock the pavers into place. Allow the sand to cure for 24-48 hours before using the area, ensuring a firm, stable surface that will last for years.
Step 5: Remove Excess Sand and Inspect the Joints
Once the polymeric sand has cured, remove any excess sand from the surface using a leaf blower or a soft broom. Inspect the joints to ensure they are properly filled.
Refill any gaps with additional sand, if necessary, to maintain stability and prevent weed growth. This final step ensures that your pavers are secure, neat, and long-lasting.
Benefits of Polymeric Sand Over Traditional Sand
Polymeric sand offers numerous advantages over traditional sand, providing enhanced durability, weed prevention, and reduced maintenance. Here is why it’s the superior choice for long-lasting, stable, and beautiful paver installations.
- Superior Durability: Polymeric sand is more durable than traditional sand, as it binds together when activated with water. This prevents erosion and washouts, offering long-lasting stability for your paver installation.
- Weed Prevention: Polymeric sand forms a strong, hardened surface that blocks weed growth, unlike traditional sand. It prevents weeds from sprouting between pavers, reducing the need for constant maintenance or chemical treatments.
- Reduced Maintenance: Polymeric sand requires significantly less maintenance over time due to its resistance to shifting and erosion. It ensures that your paver joints remain intact and reduces the need for frequent repairs.
- Prevents Ant Colonies: The hardened surface created by polymeric sand deters ants from building colonies between pavers. This helps maintain the integrity of your patio or driveway and reduces the likelihood of pest problems.
- Enhances Drainage: Polymeric sand allows water to flow through the joints while maintaining joint stability. This helps to reduce the risk of water pooling or erosion, improving the overall drainage of your paved area.
Common Mistakes to Avoid When Using Polymeric Sand
While polymeric sand offers numerous benefits, applying it incorrectly can lead to costly mistakes. Avoid these common errors to ensure your paver installation stays strong, stable, and long-lasting.
1. Applying Polymeric Sand in Wet Conditions
Using polymeric sand in wet or rainy weather can interfere with its proper activation, preventing it from binding effectively. For optimal results, ensure the surface is completely dry, as moisture can lead to uneven hardening and a weakened bond.
2. Over-Wetting the Sand
Applying too much water to polymeric sand can cause it to become overly saturated, washing away or not setting properly. This can lead to ineffective joint filling and ultimately reduce the sand’s ability to prevent shifting or weed growth.
3. Not Compacting the Sand Properly
Insufficient compaction of polymeric sand can result in loose, uneven pavers. If the sand isn’t compacted well, the pavers may shift over time, causing instability. Be sure to compact in multiple directions to ensure the sand fills all joints evenly and securely.
4. Using the Wrong Type of Polymeric Sand
Choosing the wrong type of polymeric sand for your specific paver installation can cause issues like improper joint filling or reduced durability. For best results, select the correct sand based on factors such as joint width, paver material, and your local climate.
How to Maintain Pavers Installed with Polymeric Sand
Maintaining your pavers installed with polymeric sand is key to preserving their longevity and appearance. Follow these simple tips to keep them looking great and functioning perfectly for years.
- Clean the Pavers Regularly: Sweep the surface to remove dirt, leaves, and debris. Use a pressure washer on a low setting to clean without disturbing the polymeric sand in the joints.
- Replenish Polymeric Sand: Over time, polymeric sand may settle or wear away. Reapply and compact sand in the joints to maintain stability and prevent weed growth.
- Protect from Water Damage: Ensure proper drainage and clear gutters and drains. Consider using a water-repellent sealer to prevent erosion and moisture damage to the pavers.
- Inspect the Joints: Regularly check the joints for signs of sand erosion or gaps. Refill any areas that have lost sand to maintain paver stability and prevent weeds from growing through.
- Seal the Pavers: Apply a protective sealant to prevent stains, fading, and moisture penetration. Sealing helps preserve the appearance of your pavers and extends their lifespan.
- Avoid Heavy Loads: Be mindful of heavy furniture, equipment, or vehicles placed on the pavers. Excessive weight can cause shifting or cracking over time, potentially damaging the polymeric sand joints.
Conclusion
Incorporating polymeric sand into your paver installation ensures a stable, long-lasting surface that resists weeds and shifting. By following the right application steps and maintenance tips, you can enjoy a flawless patio or driveway for years.
Ready to enhance your outdoor space? Explore our range of high-quality polymeric sands at Splendour in Stone and make your paver installation project a success today.
More To Explore

How to Tell If Stone Is Porous or Not
When selecting stone for your home or project, knowing whether it’s porous can make a huge difference. Porosity affects how your stone absorbs water, stains,

Split Face Stone: What It Is and When to Use It
Looking for a unique, durable material to elevate your next project? Split face stone might be the perfect choice. Known for its textured finish and


