Frustrated by the barren gaps between your pavers, which lack charm and character? These empty spaces detract from the overall aesthetic appeal of your outdoor space, leaving it feeling incomplete and uninspired.
Enter the enchanting world of moss cultivation between pavers—a transformative solution.
Delve into our comprehensive guide to discover the secrets of fostering lush, verdant moss carpets and elevating your outdoor oasis to new heights of natural beauty and tranquillity.
Step 1: Choose the Right Moss
Selecting the appropriate moss is crucial for achieving a lush, green appearance between pavers.
A suitable moss can transform your outdoor space, adding charm and character while requiring minimal maintenance. Choosing moss varieties that thrive in your specific environment is essential to ensure success.
First, consider the climate and light conditions of your area. Mosses like Bryum argenteum (Silver Moss) and Hypnum cupressiforme (Cypress-leaved Plait Moss) are widespread, as they adapt well to various conditions.
Silver Moss is known for its resilience in urban settings, while Cypress-leaved Plait Moss prefers shadier, moist areas and is excellent for creating a carpet-like effect.
Evaluate the moisture levels and pH of the soil between your pavers. Moss generally prefers acidic to neutral pH levels and constant moisture. Choose a drought-tolerant moss variety if your region is dry or the paver gaps lack shade.
Lastly, consider the aesthetic you wish to achieve. Mosses differ in texture and colour, from vibrant green to subtle grey-green hues. Select a moss variety that complements your landscape design to create a harmonious and visually appealing space.
Step 2: Select the Right Pavers
Choosing the appropriate pavers is essential for successfully growing moss between them, as the paver material and design can significantly impact moss growth and overall aesthetic appeal. To create a harmonious blend of moss and pavers, consider the following factors:
Opt for porous materials like natural stone, concrete, or brick, which allow water to permeate and promote moss growth. Avoid non-porous materials, such as polished stone or ceramic, as they can hinder water absorption and create unfavourable conditions for moss.
Pavers with a rough or textured surface provide better anchorage for moss, enhancing its ability to adhere and thrive. Textured surfaces also create an organic appearance, complementing the natural look of moss.
Choose pavers in earth tones, such as grey, brown, or terracotta, which contrast beautifully with the vibrant green of moss. This contrast enhances the visual appeal of your pathway while maintaining a natural and cohesive look.
Consider using pavers with varied shapes and sizes to create interesting patterns that highlight the moss. Ensure the gaps between pavers are wide (typically 1-2 inches) to allow adequate space for moss to grow without overcrowding.
Step 3: Prepare the Site
Proper site preparation ensures moss thrives between pavers, providing a seamless and lush appearance.
Begin by evaluating the existing paver layout and condition. Clear any debris, such as leaves, weeds, and dirt, from the gaps between the pavers, as these can inhibit moss growth and disrupt the aesthetic appeal.
Next, assess the paver alignment and ensure they are level and stable. Uneven pavers can create water drainage issues, making it difficult for moss to establish a consistent, healthy growth pattern. Adjust or re-level the paver heights if necessary to ensure a uniform surface.
The soil between the pavers should be amended to create optimal growing conditions for moss. By adding organic materials such as peat moss or compost, aim for a slightly acidic to neutral pH. These materials help maintain moisture and provide essential nutrients.
Moisten the soil before introducing moss to ensure it has adequate water to establish itself. Moss requires consistent moisture, so consider regularly installing a drip irrigation system or hand-watering to maintain the ideal damp environment.
These steps will create the perfect conditions for your moss to flourish and transform your outdoor space.
Step 4: Propagation Methods
Several effective methods for propagating moss between pavers are suited to different needs and conditions. Understanding these techniques will help you achieve lush and even moss coverage.
Transplanting Moss Patches
One of the simplest methods is transplanting existing moss patches from other areas of your garden or a nursery. Carefully remove moss with a thin layer of soil attached and place it into the prepared gaps between pavers.
Press down gently to ensure good contact with the substrate. This method provides immediate results and is ideal for small areas.
Moss Slurry Method
The moss slurry technique is excellent for larger areas or irregular spaces. To create a paste, blend fresh moss with water and a small amount of buttermilk or yoghurt.
The buttermilk or yoghurt helps the moss adhere to surfaces and provides nutrients. Spread this mixture evenly in the paver gaps and ensure consistent moisture to facilitate growth.
Moss Spores
For those who prefer a more gradual approach, moss spores can be sown into the soil between pavers. Sprinkle the spores over the area and mist lightly with water. This method takes longer to establish but can result in a more natural appearance over time.
Each of these propagation methods has advantages, so choose the one that best suits your garden’s conditions and personal preferences.
Step 5: Plant Moss Between Pavers
Planting moss between pavers is a simple yet rewarding process that can enhance the beauty of your outdoor space.
Begin by selecting healthy moss from your garden or a reputable nursery. Ensure the moss is moist and vibrant, indicating it is healthy and ready for transplantation.
To plant the moss, first prepare a moss slurry by blending the moss with water and a small amount of buttermilk or yoghurt. This mixture helps the moss adhere to the substrate and provides nutrients to encourage growth.
Pour the slurry into the gaps between the pavers, ensuring it fills the spaces evenly. Alternatively, you can transplant moss directly by pressing small patches into the prepared soil between the pavers. Gently press the moss to ensure good contact with the soil, which is essential for root establishment.
After planting, mist the moss with water to maintain moisture levels. Moss thrives in consistently damp conditions, so it remains moist, especially during the initial establishment phase.
Until firmly rooted, avoid direct sunlight and foot traffic on the newly planted moss. With proper care, your moss will soon create a lush, green carpet between your pavers, enhancing your landscape’s natural beauty.
Step 6: Caring for Moss Between Pavers
Caring for moss between pavers is relatively straightforward but requires attention to specific maintenance tasks to ensure the moss remains healthy and vibrant over time.
- Watering: Moss thrives in consistently moist conditions. Regularly mist the moss, especially during dry periods, to maintain adequate moisture levels. Avoid over-watering, which can lead to fungal growth or rot. A light, frequent misting is usually sufficient.
- Light Conditions: Moss generally prefers shade or indirect light. Excessive sunlight can cause moss to dry out and become patchy. If your moss is in a sunny area, consider providing temporary shading or relocating it to a more shaded spot.
- Weed Control: Keep the area between the pavers free from weeds and debris, which can compete with moss for nutrients and moisture. Gently remove weeds or use a hand tool to avoid disturbing the moss.
- Cleaning: Occasionally clear away fallen leaves and debris that can smother the moss and impede its growth. Use a soft brush or broom to avoid damaging the moss.
- Trimming: If moss begins to overgrow or encroach on surrounding areas, trim it back carefully to maintain a neat appearance and prevent it from spreading beyond desired limits.
Controlling Weeds and Competing Vegetation
Weeds and competing vegetation threaten the health and vitality of moss between pavers. Implement the following strategies to control weeds and maintain the integrity of your moss garden:
- Manual Removal: Regularly inspect the moss for weeds and remove them by hand, ensuring minimal disturbance to the moss.
- Mulching: Apply a layer of organic mulch, such as shredded bark or compost, between pavers to suppress weed growth and retain moisture in the soil.
- Herbicides: Exercise caution when using herbicides near moss, as they can damage or kill the moss if not applied carefully. Opt for natural or organic herbicides that pose minimal risk to moss and other desirable plants.
Dealing with Moss Pests and Diseases
While moss is relatively resistant to pests and diseases, occasional issues may arise. Monitor closely for signs of pests or disease, such as discolouration, browning, or abnormal growth patterns. If problems occur, take the following steps:
- Pest Management: Use environmentally friendly methods, such as handpicking or natural predators, to control pests such as slugs, snails, and aphids.
- Disease Prevention: Maintain good airflow and drainage around the moss to prevent fungal diseases and rot. Avoid overwatering or allowing water to stagnate on the moss surface.
Step 7: Troubleshooting Common Issues
Addressing common issues with moss between pavers ensures a thriving and visually appealing garden feature. Here’s how to resolve typical problems:
Dry or Patchy Moss
Dry patches are often due to insufficient moisture. Increase the frequency of misting, especially during hot, dry weather. Ensure that the soil between the pavers remains consistently damp but not soggy. If patches persist, check for drainage issues or add a layer of organic mulch to retain moisture.
Excessive Algae Growth
Algae can outcompete moss if the area is overly moist or shaded. Reduce the amount of standing water and increase air circulation around the moss. Avoid using fertilisers, as they can promote algae growth. Regularly remove algae by gently scrubbing the affected areas with a soft brush.
Moss Discolouration
Yellowing or browning moss may indicate too much direct sunlight or poor soil conditions. Move the moss to a shadier spot and improve the soil’s acidity by adding organic matter like peat moss. Ensure that the moss receives adequate moisture and avoid excessive foot traffic.
Weeds and Debris
Weeds and debris can smother moss and impede growth. Regularly remove weeds by hand and clear debris using a soft brush to prevent it from covering the moss and reducing its health.
Step 8: Enhancing Aesthetics and Functionality
Moss creates a lush, natural look that complements various paver styles and landscape designs. Select moss varieties that blend well with your paver colours and textures for a cohesive appearance. Use moss to fill gaps irregularly for a more organic, natural feel, or create defined patterns to add visual interest.
Beyond their practical benefits, moss between pavers adds a unique aesthetic and functional dimension to outdoor spaces. Explore creative ways to enhance the beauty and functionality of your moss garden between pavers.
Design Ideas for Incorporating Moss into Your Outdoor Space
Incorporating moss into your outdoor space adds a touch of natural beauty and tranquillity. Here are some creative design ideas to make the most of moss between pavers and other areas:
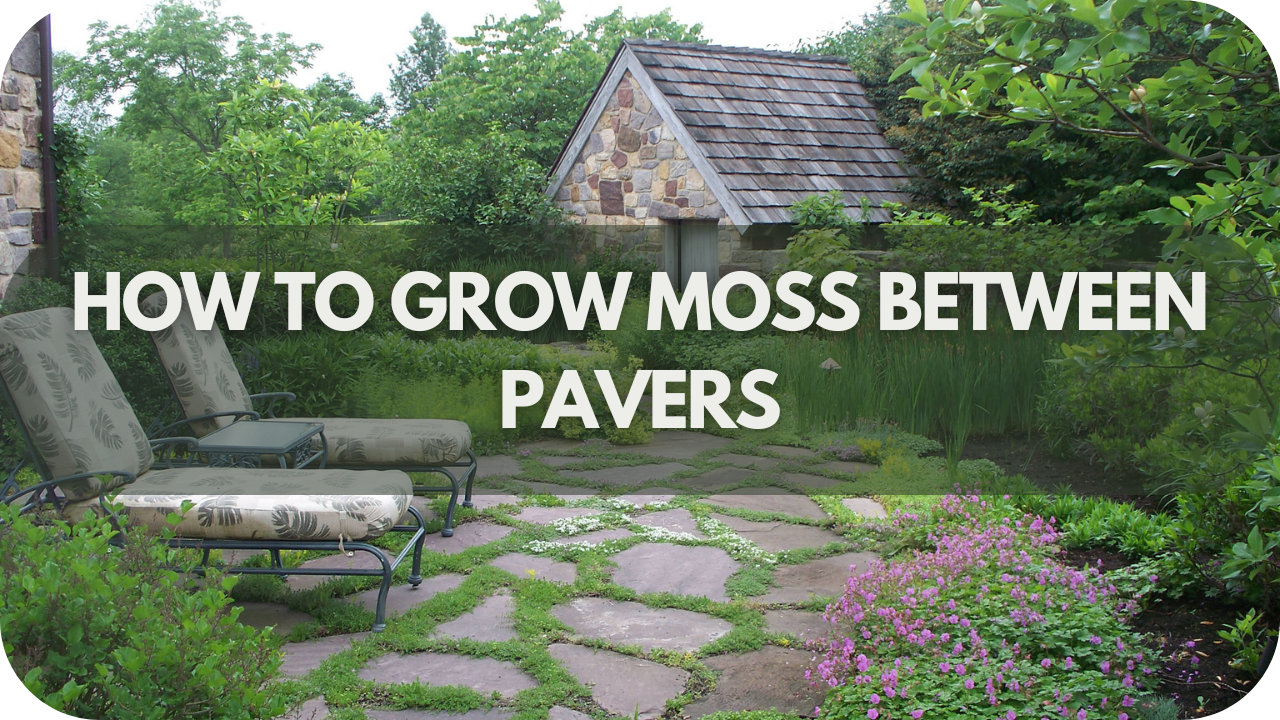
- Moss-Covered Pathways: Allow moss to grow between pavers to create serene, enchanting pathways. This softens the appearance of traditional hardscapes and provides a lush, green contrast. Choose pavers with irregular shapes for a more natural, winding look, or opt for a geometric pattern to add visual interest.
- Moss Gardens: Design dedicated moss gardens by planting moss between stepping stones or within garden beds. Combine different moss species to achieve varying textures and shades, creating a textured green carpet that complements other plants and flowers.
- Moss Wall Features: Incorporate moss into vertical garden designs or as part of a moss wall feature. Mount a frame or create a vertical structure filled with moss to add a striking, living element to fences or walls. This vertical approach brings a fresh perspective to garden design.
- Moss-Embedded Seating Areas: Transform seating areas by integrating moss between pavers or around outdoor furniture. Moss-covered seating spaces provide a soft, natural cushion and create a relaxing atmosphere, ideal for garden lounges or reading nooks.
- Moss-Covered Steps: Add a touch of elegance and nature to stairways or garden steps by growing moss between or around the steps. This design adds a charming, rustic feel and enhances the visual appeal of stairways, making them a focal point in your garden.
Benefits of Moss Between Pavers Beyond Aesthetics
By creating a hospitable environment for moss, you support biodiversity and ecological balance in your garden.
- Water Retention: Moss acts as a natural sponge, absorbing and retaining water in the soil between pavers. This helps to reduce water runoff and erosion, promoting a healthy and sustainable water cycle in your garden.
- Erosion Control: The dense, fibrous root structure of moss helps to stabilise soil and prevent erosion between pavers. Planting moss on slopes or in areas prone to erosion can help mitigate the effects of runoff and soil displacement.
- Habitat Creation: Moss provides valuable habitat and food sources for various beneficial insects, including pollinators and decomposers.
To keep moss looking its best, ensure it receives consistent moisture and is debris-free. Trim surrounding plants and maintain proper light levels to prevent moss from becoming overgrown or shaded.
To sustain its aesthetic and functional benefits, regularly check for and address any issues, such as excess debris or dry patches.
Conclusion
Cultivating moss between pavers is a sustainable and enchanting way to enhance outdoor spaces. Apply the principles shared to embrace its beauty and ecological benefits.
Start your moss-growing journey today and transform your landscape into a verdant oasis of natural charm.
More To Explore

Is Porphyry the Best Choice for High-Traffic Outdoor Areas?
Choosing the right stone for high-traffic outdoor spaces is essential to ensure both durability and aesthetic appeal. Porphyry, a natural stone known for its exceptional

What Makes Travertine Perfect for Pool Coping?
Pool coping is more than just a finishing touch. It plays an essential role in both safety and style around your swimming pool. Choosing the


