

To lay crazy paving, you prepare a firm, compacted base, dry-lay the irregular flags to work out the jigsaw, bed each piece on a mortar or sand bed, cut edge pieces to fit, then joint and seal. The method is the same random-fit puzzle, whether you are paving a patio, a path, or a courtyard, and getting the base and the joints right is what separates a surface that lasts from one that lifts or rocks.
This guide walks through the full process for laying crazy paving, answers the questions most people ask before they start, and flags where you should confirm exact figures with a stone supplier or product data sheet.
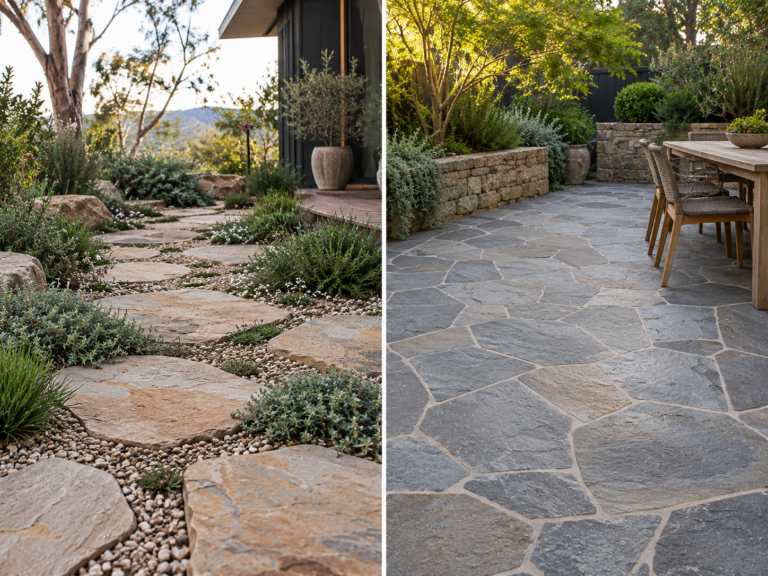
Crazy paving is natural stone laid in an irregular, random-jointed pattern rather than a regular grid. Because every flag is a different shape, the work is slower and more considered than laying rectangular pavers, but the result is a continuous stone surface with no repeating lines. You can browse natural stone options on the Splendour In Stone paving hub if you are still choosing a material.
How Do You Lay Crazy Paving?
You lay crazy paving by building a stable base, dry-laying the flags to plan the fit, then bedding, cutting, jointing, and sealing them in sequence. The core sequence is: excavate and compact a sub-base, set out and dry-lay the stone jigsaw, mix and lay a bedding layer, bed each flag with a consistent fall for drainage, cut the perimeter pieces, fill the joints, and finally seal the stone once everything has cured.
Most patios and paths are laid on a mortar bed over a compacted base for a permanent finish, while some low-traffic paths can be sand-set. The steps below cover the mortar-set method, which is the most durable and the most common for Australian outdoor use.
Tools and Materials You Will Need
Before you start laying crazy paving, gather the tools for excavation, mixing, cutting, and finishing so you are not stopping mid-job. Having everything to hand also helps you keep a wet mortar bed workable, which matters once you begin bedding stone:
- Excavation and levelling: spade, mattock or hoe, wheelbarrow, rake, spirit level, string line and pegs, rubber mallet.
- Base and compaction: road base or crushed rock for the sub-base, a plate compactor (hired or owned) for larger areas, a hand tamper for small ones.
- Bedding and jointing: cement, sharp sand and aggregate for mortar (or a proprietary bedding and jointing product), a mixing board or mixer, a bucket and a pointing trowel.
- Cutting: an angle grinder or wet saw with a diamond blade, plus safety glasses, gloves, ear protection, and a dust mask.
- Finishing: a stiff broom, a sponge and clean water, and a stone sealer suited to your chosen material.
Confirm the exact bedding and jointing products with your stone supplier, because the right mix and sealer depend on the specific stone you are laying. Splendour In Stone can advise on suitable products for the material you choose; you can reach the team through the contact page.
Step-by-Step: Laying Crazy Paving

The full method runs in seven ordered stages, from base preparation to sealing. Work through them in order and do not rush the base or the curing, as those are the stages that determine whether the finished surface stays flat and stable.
1. Prepare the Base
Excavate to a depth that allows for your sub-base, bedding, and the paver thickness, then compact a firm sub-base. As a general guide, many patio installations excavate around 150 to 200 mm to allow for a compacted crushed-rock sub-base plus the mortar bed and the stone, but the exact depth depends on the ground conditions and the intended use, so confirm your build-up before you dig.
Lay and compact the sub-base in layers with a plate compactor, checking for a slight, consistent fall (commonly around 1:60 to 1:80, roughly a 15 mm drop per metre) so water runs away from buildings. A well-compacted, free-draining base is the single most important part of the job.
2. Dry-lay and Arrange the Pieces
Lay the flags out loosely on the base first to plan the jigsaw before any mortar goes down. Position the larger stones first, then fill the gaps with smaller pieces, aiming for consistent joint widths and avoiding long continuous lines or four flags meeting at one point.
Mix pieces from different pallets as you go, so colour and size are distributed evenly. Take a photo or number the pieces once you are happy, so you can reproduce the layout when you start bedding.
3. Mix and Lay the Bed
Mix a mortar bedding layer and lay enough for one or two flags at a time, so it does not dry out before you place the stone. A commonly cited bedding mix for stone paving is around 3 to 4 parts sharp sand to 1 part cement, but you should follow the cement manufacturer’s guidance and your stone supplier’s recommendation for the specific stone, as the ideal mix varies
Lay the mortar to a consistent thickness across the area you are about to work, keeping it workable and not too wet.
4. Bed the Pavers
Place each flag onto the wet bed and tap it down with a rubber mallet until it sits at the right level with the correct fall. Use a full bed under the whole flag rather than spot dabs, so there are no voids where water can collect, or the stone can crack under load.
Check each piece against a level and a string line as you go, and keep joint widths consistent. Work outward from one edge so you are always placing onto a fresh bed and not kneeling on laid stone.
5. Cut to Fit
Cut the perimeter and any awkward infill pieces to fit using an angle grinder or wet saw fitted with a diamond blade. Mark the cut line, wear eye, ear, and respiratory protection, and cut slowly to keep the edge clean. Dry-fit each cut piece before bedding it. Cutting to fit is what gives crazy paving its tight, continuous edges rather than a ragged perimeter.
6. Joint and Grout
Once the bed has set, fill the joints between the flags with your chosen jointing material. You can point mortar into the joints with a trowel, brush in a dry or slurry paving compound, or use a proprietary jointing product, depending on the look and the joint width.
Fill the joints fully, tool them to a neat profile, and clean any residue off the stone face before it dries. Leave the joints to cure per the product instructions before using the surface.
7. Seal
Seal the paving once the stone and joints are fully cured and dry, using a sealer suited to your material. Sealing helps protect porous stones such as travertine, limestone, and sandstone against staining and weathering.
Follow the sealer manufacturer’s instructions for coverage, number of coats, and the interval before the surface can be walked on or exposed to water. Reseal periodically as the manufacturer recommends. Sealing is not a substitute for correct laying, and it should not be relied on to prevent all staining or wear.
What to Put Between Crazy Paving (Jointing Options)
The most common materials to put between crazy paving are a sand-and-cement mortar, a proprietary paving jointing compound, or a resin-based jointing product, chosen to suit the joint width and the look you want.
Crazy paving joints are usually wider and more irregular than joints in regular paving, so the jointing needs to fill and support those gaps as well as finish them neatly. The right choice depends on the stone, the joint size and whether the surface takes foot or vehicle traffic, so confirm the product with your supplier.
| Jointing option | Look | Best for |
|---|---|---|
| Sand and cement mortar | Traditional, solid, matte finish | Wider irregular joints on mortar-set patios and paths |
| Paving jointing compound (brush-in) | Clean, uniform, low effort | Consistent joints on foot-traffic patios and paths |
| Resin-based jointing | Firm, durable, weather-resistant | Areas wanting a tougher joint; follow product suitability |
Whatever you choose, fill the joints fully and finish them before the material dries on the stone face. For advice on the right jointing product for a specific stone, the Splendour In Stone team can help through the contact page.
How Thick Should Crazy Paving be And What Base do You Need?

Crazy paving stone is commonly supplied in thicknesses around 20 to 40 mm for pedestrian areas, laid on a compacted crushed-rock sub-base with a mortar bed, but the exact thickness depends on the stone and the use, so confirm it against product specifications.
Thicker stone is generally specified where the surface will carry heavier loads, such as a driveway, while thinner flags suit patios and paths. The foundation for crazy paving is a firm, well-compacted, free-draining base: a granular sub-base topped with a full mortar bed for a permanent installation.
Do not treat these figures as fixed specifications, as the correct thickness and base build-up for your project should be confirmed with your stone supplier and, for structural or vehicle-loaded areas, a qualified installer. For driveways and other high-traffic areas, the base, the stone thickness, and the laying method all step up. A dedicated guide to laying crazy paving for driveways covers that in detail.
Can You Dry-lay Crazy Paving?
You can dry-lay crazy paving, meaning you set the flags on a compacted base with sand rather than a mortar bed, but it suits low-traffic paths and informal areas rather than patios or driveways. Dry-laying, sometimes called sand-set, is quicker and lets you lift and adjust pieces, and it allows water to drain through the joints.
The trade-off is that a dry-laid surface is less stable over time, more prone to movement, weeds and ants in the joints, and not suited to loads or heavy use. For a patio you will use often, a driveway, or any area that needs to stay dead flat, a mortar-set installation on a proper base is the more durable choice. Confirm the right approach for your site and stone before you commit.
Common Mistakes to Avoid
Most crazy paving problems trace back to a handful of avoidable errors, and nearly all of them happen at the base and bedding stage. Getting these right the first time saves lifting and relaying later:
- Skipping proper compaction: an under-compacted or poorly draining base is the leading cause of flags that sink, rock or crack.
- Using spot dabs instead of a full bed: voids under the stone trap water and leave the flag unsupported, which can lead to cracking.
- No fall for drainage: without a slight, consistent fall away from buildings, water pools on the surface and in the joints.
- Poor joint filling: joints left partly filled or smeared across the stone face look untidy and let water and weeds in.
- Sealing too soon or skipping it: sealing damp or uncured stone can trap moisture, while leaving porous stone unsealed makes it harder to keep clean.
If you would rather not take on the base and bedding work yourself, professional installation gives you the best chance of a flat, durable result. You can also request a free quote for supply or advice on your project.
Frequently Asked Questions
1. What do you put between crazy paving?
You put a sand-and-cement mortar, a brush-in paving jointing compound, or a resin-based jointing product between crazy paving, chosen to suit the joint width and the traffic. Crazy paving joints are wider and more irregular than regular paving joints, so the jointing material needs to fill and support the gap as well as finish it neatly. Confirm the right product for your specific stone with your supplier.
2. How thick should crazy paving be?
Crazy paving stone is commonly around 20 to 40 mm thick for pedestrian areas, with thicker stone generally used for driveways and high-traffic areas, but the exact thickness depends on the stone and use. Treat these as general figures and confirm the correct thickness against product specifications and, for vehicle-loaded areas, with a qualified installer.
3. Can you dry-lay crazy paving?
Yes, you can dry-lay crazy paving on a compacted base with sand, but it suits low-traffic paths and informal areas rather than patios or driveways. Dry-laying is quicker and adjustable but less stable over time and more prone to movement and weeds, so a mortar-set installation is the more durable choice for surfaces in regular use.
4. What is the foundation for crazy paving?
The foundation for crazy paving is a firm, well-compacted, free-draining base: a granular crushed-rock sub-base topped with a full mortar bed for a permanent installation. The base must be compacted and laid to a slight fall for drainage, and the exact build-up depth should be confirmed for your ground conditions and intended use.
5. Is it better to lay crazy paving yourself or hire a professional?
Laying crazy paving yourself is achievable for a confident DIYer on a small, low-traffic area, while larger patios, driveways and any surface that must stay dead flat are best left to a professional. The base preparation, consistent fall, full bedding and cutting are where most DIY installations go wrong, so weigh your experience against the size and use of the area.