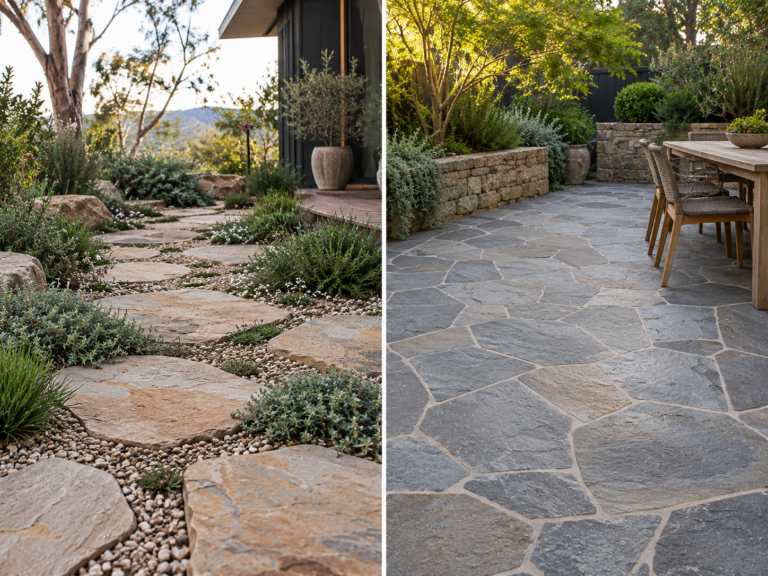


Stepping stones are individual pavers or stone slabs placed at comfortable walking intervals to create a path through lawn, gravel, garden beds or other landscaped areas. They guide movement without covering the entire surface, allowing planting and loose materials to remain visible between each stone.
A successful stepping stone path depends on three things: comfortable spacing, a stable base and stone that suits the location. Layout, surface finish, drainage and maintenance also influence how safe and practical the finished path will be.
Stepping Stones at a Glance
Stepping stones work best for informal garden routes, lawn crossings, side paths and landscaped transitions where a continuous paved walkway would feel too heavy.
- Typical placement: Lawn, gravel, garden beds, groundcover or compacted paving bases.
- Spacing starting point: Around 450 to 600 mm from the centre of one stone to the centre of the next for many adult users.
- Best spacing method: Measure the natural stride of the people who will use the path most often.
- Popular materials: Bluestone, sandstone, travertine, granite and limestone.
- Suitable finishes: Textured, sawn, flamed, tumbled or naturally split finishes, depending on the stone and application.
- Main installation priority: Every stone must remain stable and level without rocking.
- Maintenance needs: Sweeping, weed control, checking settlement and cleaning with stone-compatible products.
The spacing range above is general guidance rather than a fixed standard. Children, older users, sloping ground and frequently used access routes may require closer or more consistent placement.
What Are Stepping Stones?
Stepping stones are separate pieces of paving positioned to match a person’s stride. Unlike a fully paved path, they leave visible gaps between each stone.
Those gaps may contain:
- Lawn
- Decorative gravel
- Pebbles
- Mulch
- Low-growing groundcover
- Compacted soil
- Other landscape materials
This creates a lighter and more open appearance than continuous paving. It also allows a path to move through planting or lawn without visually dividing the garden into rigid sections.
Stepping stones form part of the hardscape, which includes the non-living structures used in landscape design. Paving, paths, retaining walls, edging and stone features are all hardscape elements, while lawns, trees and garden beds form the softscape.
Understanding the difference between hardscape, softscape and the wider landscape makes it easier to balance built surfaces with planting.
Where Do Stepping Stones Work Best?
Stepping stones are useful where people need a clear route but a full paved walkway is unnecessary.
1. Through Lawn
Garden stepping stones can protect grass from repeated foot traffic while keeping most of the lawn visible. They work well between the house and shed, clothesline, pool, garden gate or outdoor entertaining area.
The stones should sit securely without creating raised edges that interfere with mowing or become a trip point.
2. Through Gravel
Stepping stones provide a firm walking surface through loose gravel. They prevent shoes from sinking or shifting the gravel and can make an informal side path more comfortable to use.
The stones should remain slightly prominent above the surrounding gravel while being firmly supported underneath.
3. Between Garden Beds
A stepping stone path can provide access for watering, pruning and maintenance without requiring a wide paved strip. Irregular placement often suits planted areas because it feels less formal and follows the shape of the garden.
Allow enough clearance around each stone so plants do not completely cover the walking surface.
4. Along Side Access Routes
Narrow side areas can feel crowded when fully paved. Large stepping stones set in gravel can keep the route practical while allowing drainage and reducing the visual weight of the surface.
Frequently used side access may need closer spacing and larger stones than a decorative garden path.
5. Around Pools and Outdoor Features
Stepping stones can connect a house, pool, outdoor shower, fire pit or seating area. Materials used near water must have a finish and installation specification suited to repeated wetting.
Do not assume that a stone is suitable for wet areas based on appearance alone. Request product-specific information about the surface finish and intended use.
6. Across Courtyards
Large-format stepping pavers can break up broad areas of gravel or groundcover. Their alignment can also reinforce architectural lines between doors, gates and garden features.
The wider garden pavers and pathways guide covers fully paved paths, gravel routes and other walkway formats where stepping stones are only one possible solution.
How Far Apart Should Stepping Stones Be?

As a starting point, many adult stepping stone paths feel comfortable at approximately 450 to 600 mm centre to centre, but the correct spacing is the measured natural stride of the path’s main users.
Centre-to-centre spacing means measuring from the middle of one stone to the middle of the next. Measuring only the visible gap can be misleading because stepping stones may have different dimensions.
How to Measure the Right Spacing
- Mark the approximate route with a hose, rope or temporary line.
- Walk along the route at a normal, relaxed pace.
- Ask another person to mark where the centre of each foot lands.
- Measure between the marks.
- Repeat the walk several times.
- Use the average distance as the initial stone spacing.
- Place the stones loosely and test the path before excavation.
Do not position every stone using measurements alone. The route should be walked by the people who will use it most often.
Adjust Spacing for Different Users
Closer spacing may be appropriate for:
- Children
- Older family members
- People with limited mobility
- Short side paths
- Routes carrying tools or bins
- Sloping ground
- Paths used in wet conditions
Wider spacing may suit a relaxed decorative route through a large garden, but the user should never need to stretch or jump between stones.
Account for Stone Size
Large stepping stones provide more room for natural foot placement. Small stones require more precise spacing and alignment.
For a regularly used path, each stone should generally be large enough to receive most of the foot without forcing the user to balance on the edge.
Test Both Directions
A path may feel comfortable when walking towards the garden but awkward when returning towards the house. Test the dry layout in both directions before fixing the stones into position.
Stepping Stone Path and Walkway Layout Ideas
The best layout should follow how people naturally move through the space. A path that looks attractive but cuts across the wrong route will eventually be ignored.
1. Straight and Linear Layout
A straight path creates a direct connection between two points. It suits:
- Contemporary homes
- Side access
- Front entrances
- Courtyards
- Narrow rectangular gardens
Use consistent stone sizes and spacing to reinforce the clean geometry.
2. Staggered Layout
A lightly staggered path alternates stones from side to side while maintaining a comfortable stride. It feels more relaxed than a straight centre line but still provides a clear route.
This works well through lawn, gravel and informal planting.
Avoid excessive side-to-side movement. The user should not need to change direction with every step.
3. Curved Garden Path
A curved path slows movement and creates a more gradual journey through the garden. It can follow planting beds, existing trees or changes in level.
Use gentle curves rather than several sharp turns. The route should feel natural when walked, not simply when viewed from above.
4. Stepping Stones in Gravel
Large-format stones surrounded by gravel create a balanced combination of structure and softness. The gravel fills the spaces between each paver and can connect the path with adjacent garden beds.
Choose gravel that complements the stone colour without making the edges difficult to see.
5. Stepping Stones Through Lawn
Stones set within turf create a simple garden route without removing a large section of lawn. Rectangular pavers give the path a modern appearance, while irregular stones create a more natural look.
Consider how the route will be mown and edged before selecting the stone dimensions.
6. Double-Width Stepping Path
Two stones positioned beside each other create a broader walkway for shared access. This may suit:
- Front gardens
- Busy side paths
- Routes used by two people
- Access to entertaining areas
- Paths carrying bins or garden equipment
The stones can be aligned evenly or offset in a repeating pattern.
7. Mixed Stone and Groundcover
Low-growing plants between stepping stones soften the path and help it settle into the garden. Suitable planting should tolerate occasional foot contact and the available sunlight, moisture and soil conditions.
Leave enough of each stone exposed to provide a visible and stable walking surface.
8. Stepping Stones with Cobblestone Edging
Cobblestones can define the outer edge of a gravel or planted stepping stone path. They help contain loose materials and create a clearer transition into lawn or garden beds.
Splendour in Stone’s natural stone cobblestone range includes materials that can be considered for path borders, feature bands and fully paved walkway sections.
9. Transition into Continuous Paving
Stepping stones can lead into a patio, entrance or fully paved area. Using the same stone family or a related colour can make the transition feel deliberate.
The change from individual stones to full paving should occur at a logical destination, such as a doorway, gate, seating zone or courtyard.
Best Stones for Stepping Stones

The best stone depends on appearance, surface finish, traffic, moisture, maintenance and budget. Product thickness and installation requirements must also suit the base and intended application.
| Stone | Typical Appearance | Surface Considerations | Maintenance | Best Uses | Main Cost Variables |
| Bluestone | Blue-grey to charcoal | Sawn, natural or flamed finishes can provide different levels of texture | Low to moderate | Modern paths, lawn steppers and high-use routes | Finish, thickness, size and stone selection |
| Sandstone | Cream, gold, tan, brown and earthy variation | Naturally textured or split finishes suit informal gardens | Moderate | Native gardens, country homes and relaxed paths | Colour selection, thickness, grading and freight |
| Travertine | Ivory, beige, silver and warm neutral tones | Tumbled finishes create texture, while honed surfaces feel smoother | Moderate | Coastal gardens, courtyards and alfresco paths | Colour, filling, finish, format and thickness |
| Granite | Grey, charcoal or speckled tones | Flamed and textured finishes suit exposed walking surfaces | Low | High-use paths, contemporary homes and formal routes | Density, finish, large-format cutting and transport |
| Limestone | Cream, beige, grey and warm neutral tones | Tumbled or textured finishes suit garden settings | Moderate | Courtyards, light gardens and refined walkways | Stone variety, finish, dimensions and porosity |
These comparisons are general. Performance and maintenance can vary within the same stone family.
1. Bluestone Stepping Stones
Bluestone creates a structured and contemporary path. Its grey and charcoal palette works well with:
- Modern architecture
- Black steel edging
- Concrete
- Grey render
- Native planting
- White or light gravel
- Dark mulch
Rectangular bluestone steppers reinforce straight architectural lines, while irregular or large-format pieces can soften a planted garden.
Surface finish matters. A flamed or naturally textured finish provides more surface texture than a highly smooth finish, but wet-area performance should still be checked for the specific product.
Material-specific ideas for using bluestone steppers in garden paths can help with colour combinations and landscape styling.
2. Sandstone Stepping Stones
Sandstone brings warmer colour and natural variation to a path. Cream, beige, gold and earthy brown tones pair naturally with timber, gravel and native planting.
It can suit:
- Country gardens
- Heritage homes
- Bushland properties
- Informal paths
- Mediterranean planting
- Warm brick exteriors
Sandstone porosity and strength vary. Confirm the selected stone’s thickness, finish and suitability for the expected traffic before ordering.
Availability of sandstone stepping stone formats should also be confirmed directly with the supplier.
3. Travertine Stepping Stones
Travertine creates a softer and more refined garden path. Ivory and beige tones work well with coastal or Mediterranean landscapes, while silver travertine gives the design a cooler contemporary direction.
Tumbled edges can create a relaxed, established appearance. Natural pores, filled surfaces and different finishes can affect cleaning and maintenance, so compare physical samples before making a decision.
Travertine may suit paths linking patios, courtyards and covered alfresco areas where the same stone family is used elsewhere.
4. Granite Stepping Stones
Granite is suited to paths where strength and a clean architectural appearance are priorities. Grey and charcoal tones work with contemporary gardens, formal entrances and high-use routes.
A flamed or textured finish may be more appropriate for exposed paths than a highly polished surface. Large granite pieces can be heavy, so handling, transport and base preparation should be considered during planning.
5. Limestone Stepping Stones
Limestone provides a calm, understated surface in cream, beige or grey tones. It works particularly well with:
- Light render
- Coastal planting
- White gravel
- Timber
- Courtyard gardens
- Hamptons-style homes
Because limestone characteristics vary, the supplier should confirm whether the selected product and finish are suitable for exposed stepping stone use.
How to Choose Stepping Stone Pavers

Before choosing by colour, consider how the path will be used.
1. Select a Practical Size
The stone should provide enough surface area for comfortable foot placement. Larger stones are generally more forgiving because the user does not need to land in one exact spot.
Small decorative pieces may look attractive but can feel unstable or awkward on a frequently used route.
2. Confirm the Thickness
Thickness requirements depend on:
- Stone type
- Paver dimensions
- Base construction
- Soil conditions
- Foot traffic
- Installation method
- Whether garden equipment will cross the path
Do not assume that a thin tile is suitable for an unsupported lawn or gravel installation.
3. Choose the Surface Finish
The finish affects appearance, texture and maintenance.
- Flamed: A textured finish commonly used on granite and bluestone.
- Sawn: A flat surface with light texture and clean edges.
- Tumbled: Softened edges and an aged appearance.
- Natural split: Visible stone texture and variation.
- Honed: A smooth matte finish better suited to protected locations where approved.
- Polished: Usually unsuitable for exposed stepping paths unless the product has been specifically assessed for that application.
Avoid describing any stone as universally non-slip. Request relevant wet-surface information where grip is important.
4. Consider Colour Variation
Natural stone pieces will not be identical. View several samples together and inspect them in sunlight, shade and near the other materials used in the garden.
Variation should be blended across the path rather than concentrated in isolated sections.
5. Plan the Edges
Square or rectangular stones create a clean, structured line. Irregular edges feel more natural but may require more careful placement around lawn, gravel and planting.
For paths with loose surrounding materials, suitable paver edging can help keep gravel, mulch and soil from spreading onto the walking surface.
How to Lay Stepping Stones
Stepping stones can be installed in lawn, gravel or planted areas, but they should not simply be placed on loose soil. A prepared and compacted support layer helps prevent rocking, sinking and movement.
The following method is a general planning guide. Base depth, bedding material and installation requirements should be confirmed for the stone, soil and site.
1. Plan the Route
Mark the path with a garden hose, rope or marking paint. Walk the route several times and check whether it follows the natural line between destinations.
Avoid forcing unnecessary curves into a practical access path.
2. Position the Stones
Place all stones on the surface before excavating. Adjust the spacing to match a comfortable stride and test the path in both directions.
Check:
- The first step from the doorway or paved area
- Changes in direction
- Slopes
- Narrow sections
- The final step at the destination
- Access for children or older users
3. Mark Each Stone
Use a spade or marking paint to trace the outline of each stone. Number irregular pieces if they will be removed during excavation.
Leave enough space for minor adjustments during setting.
4. Excavate Each Position
Remove turf, mulch or loose soil to allow for the stone, bedding layer and prepared base.
The final height should prevent rocking, trip edges and water collection. In lawn, the stone is often set close to the surrounding turf level so mowing remains practical.
5. Prepare and Compact the Base
Compact the ground and add the base material required for the project. The right base depends on drainage, soil, stone thickness and expected traffic.
A path over soft, reactive or poorly draining ground may need more preparation than a decorative route over stable soil. The paver base material guide explains how crushed rock, bedding sand and other base options are used beneath paving.
6. Add the Bedding Layer
Use a compatible bedding material to create an even support beneath the full stone.
Do not support only the corners or edges. Voids beneath the centre can contribute to rocking or cracking.
7. Set and Level the Stone
Place the stone onto the bedding and settle it carefully using an appropriate rubber mallet.
Check that:
- The stone does not rock.
- The full underside is supported.
- The top sits at the planned height.
- Surface water can drain away.
- The next step remains comfortable.
- Raised edges do not create a trip point.
8. Fill Around the Edges
Replace turf, gravel, soil or groundcover around the stone without covering the walking surface.
Compact the surrounding material enough to support the edges while preserving drainage.
9. Walk the Finished Path
Test every stone from both directions. Pay attention to any piece that moves, sits low or forces an unnatural step.
Correct problems before the path enters regular use.
Laying Stepping Stones in Lawn
For a lawn path:
- Dry lay and test the spacing.
- Cut neatly around each stone.
- Remove the turf and enough soil for the base, bedding and stone.
- Compact the base.
- Set the stone close to the turf level.
- Check that the mower will pass safely.
- Replace soil and turf around the edges.
- Test for movement after watering or rainfall.
Avoid setting stones so low that water and mud collect across the surface.
Laying Stepping Stones in Gravel
For a gravel path:
- Prepare the full path area and install edging where required.
- Compact the sub-base before adding decorative gravel.
- Set each stone on a stable bedding layer.
- Keep the stepping surface visible above the loose gravel.
- Fill around the stones without allowing gravel beneath unsupported edges.
- Rake the gravel periodically as it moves with use.
Do not rely on loose decorative gravel alone to hold heavy stone pavers in position.
Laying Stepping Stones Through Garden Beds
For stepping stones through planting:
- Keep the path clear of irrigation lines and major roots.
- Position stones where maintenance access is genuinely needed.
- Use a stable base below mulch or topsoil.
- Allow enough clearance for plant growth.
- Keep thorny or dense plants away from the walking line.
- Prevent mulch from repeatedly covering the stone surface.
Can Stepping Stones Be Laid on a Slope?
Stepping stones can be used on gentle slopes, but the layout needs more care.
Stride length usually shortens on an incline, so stones may need closer spacing. Each stone must also be stable and positioned to reduce trip edges.
A steep route may require:
- Steps
- Retaining edges
- Drainage channels
- Handrails
- A continuous paved path
- Professional landscape or structural advice
Do not treat a steep slope as a standard flat-ground DIY installation.
Common Stepping Stone Installation Mistakes
- Spacing the Stones by Eye Alone: A path can appear balanced but still feel uncomfortable. Walk and measure the layout before excavation.
- Using Stones That Are Too Small: Small stones force precise foot placement and may feel unstable. Frequently used routes generally benefit from larger stepping surfaces.
- Laying Directly on Loose Soil: Loose soil can settle after rain, causing stones to rock or sink. Prepare a stable base suited to the site.
- Ignoring Drainage: Water collecting beneath or around the stones can contribute to movement, staining, moss and muddy edges.
- Setting Stones at Different Heights: Uneven surfaces create trip points and make lawn maintenance difficult.
- Choosing Finish Only by Appearance: A highly smooth finish may look refined but may not suit exposed or wet areas. Confirm product suitability.
- Forgetting the First and Last Step: The transition from a doorway, deck, gate or patio should feel as natural as the middle of the path.
- Allowing Plants to Cover the Route: Overgrown planting can hide stone edges and make the path difficult to use. Allow for the mature size of nearby plants.
- Mixing Too Many Materials: Several stone colours, gravel types and edging materials can make a small path feel visually cluttered. A restrained palette usually creates a more coherent result.
Stepping Stone Maintenance and Longevity

A well-installed stepping stone path usually needs simple but consistent care:
- Sweep and Rinse the Surface: Remove leaves, soil, grass clippings and grit before they settle into textured stone or joints. Use clean water and a pH-neutral product intended for natural stone when deeper cleaning is needed.
- Control Weeds Early: Pull young weeds before their roots become established around the stone edges. Avoid using chemicals that have not been confirmed as suitable for the stone and nearby plants. A weed appearing beside a stone does not always mean the base has failed. Seeds can settle into surface soil, gravel or mulch.
- Check for Rocking and Settlement: Walk the path periodically and check whether any stone moves underfoot. A rocking paver should be lifted and re-bedded rather than left until it becomes a trip point.
- Keep Lawn Edges Clear: Trim grass around lawn steppers so the edges remain visible. Soil and turf can gradually build over the stone, reducing usable surface area.
- Monitor Drainage: Persistent moss, mud or algae may indicate that the area remains wet for long periods. Check irrigation, surface falls and nearby downpipes before treating only the visible growth.
- Seal Where Appropriate: Some natural stones may benefit from a compatible penetrating sealer. The need for sealing depends on the stone, finish, location and expected staining. Test the sealer first because some products can change the colour, sheen or surface behaviour of the stone.
- Avoid Aggressive Pressure Cleaning: High pressure can damage softer stone, disturb bedding or erode surrounding joints and soil. Use the lowest effective pressure and test a small area first. More detailed advice on cleaners, stains, sealing and weather exposure is covered in the natural stone paver maintenance guide.
What Affects the Cost of Stepping Stones?
The total cost depends on more than the price of each stone.
Main cost drivers include:
- Stone type: Granite, bluestone, sandstone, travertine and limestone have different supply and processing costs.
- Stone size: Large-format pieces use more material and may require additional handling.
- Thickness: Thicker stone can increase weight, freight and installation effort.
- Finish: Flamed, tumbled, sawn and other processed finishes affect production cost.
- Quantity: Small projects may have higher delivery costs per stone.
- Site access: Narrow or difficult access increases handling time.
- Base preparation: Soft soil, drainage problems and slopes require more work.
- Layout: Curves, double-width paths and mixed-size arrangements take longer to plan.
- Excavation: Removing existing concrete, paving or established roots adds labour.
- Edging: Gravel and mulch paths may require a separate edge restraint.
- Installation: Professional labour varies according to site complexity.
- Freight: Heavy natural stone can have significant delivery costs.
- Waste allowance: Extra material may be required for breakage, cuts and future repairs.
Request a quote based on the complete route rather than comparing the stone price alone.
Plan a Stepping Stone Path That Feels Natural
A successful stepping stone path should feel comfortable from the first step to the last. The stone must suit the garden, the spacing must follow a natural stride and every piece must remain stable underfoot.
Start by marking and walking the route. Then compare stone colours, sizes and finishes in the project setting before finalising the layout.
Splendour in Stone’s natural stone paving range provides options for garden paths, courtyards and outdoor spaces. Request samples and confirm the most appropriate size, thickness, finish and installation approach for your stepping stone project.
Frequently Asked Questions
1. How far apart should stepping stones be?
A common starting point is approximately 450 to 600 mm from the centre of one stone to the centre of the next. The best spacing is the measured natural stride of the path’s main users. Test the loose layout in both directions before installation.
2. What size should garden stepping stones be?
The stone should be large enough for comfortable foot placement without requiring the user to balance on an edge. Larger pavers generally suit frequently used paths, while smaller or irregular stones may suit decorative garden routes. Exact dimensions depend on stride, path width and design.
3. Can stepping stones be laid directly on soil?
Placing stepping stones directly on loose soil can lead to rocking, sinking and uneven heights. A compacted base and compatible bedding layer normally provide better support. The required preparation depends on soil conditions, stone thickness and expected use.
4. What is the best base for stepping stones?
A compacted granular base with an appropriate bedding layer is commonly used, but the exact system depends on the site and stone. Stable, well-draining ground may need less preparation than soft, wet or reactive soil. Confirm the system with the stone supplier or installer.
5. What is the best stone for a stepping stone path?
Bluestone and granite suit structured or high-use paths, sandstone creates a warm natural appearance, travertine works well in soft neutral landscapes, and limestone provides a refined garden finish. The best choice depends on surface finish, traffic, weather exposure and maintenance.
6. Are stepping stones slippery when wet?
Wet performance depends on the individual stone, surface finish, sealer and installation. Textured, flamed or naturally split finishes may provide more surface texture than honed or polished finishes, but product-specific wet testing should guide the final selection.
7. Do stepping stones need sealing?
Some porous natural stones may benefit from sealing, particularly where staining, leaf tannins or repeated moisture exposure are likely. Dense stones may have different requirements. Use a compatible sealer and test it before treating the full path.
8. How do you stop stepping stones from sinking?
Prepare and compact the base, provide full support beneath each stone and manage drainage. Stones that have already sunk should be lifted, the bedding corrected and the paver reset at the proper height.
9. How do you prevent weeds around stepping stones?
Keep soil and organic debris from building up around the stones, remove young weeds early and maintain the surrounding gravel, lawn or groundcover. A stable base can reduce movement, but airborne seeds may still grow in surface material.
10. Should stepping stones be level with the lawn?
Stepping stones in lawn are commonly set close to the surrounding turf height so they remain comfortable to walk on and practical to mow around. They should not sit so low that water, soil or grass regularly covers the surface.
11. Can stepping stones be used on a slope?
They can work on a gentle slope when spacing, bedding and drainage are adjusted. Steeper routes may need constructed steps, retaining elements or a continuous walkway. Professional advice is appropriate where falls create a safety concern.
12. Are stepping stones cheaper than a full path?
Stepping stones can use less paving material than a fully paved walkway, but the final cost depends on the stone, base preparation, quantity, delivery and labour. Large premium slabs or difficult site conditions may still create a substantial project cost.